Many organizations today are adopting cloud-based network solutions for their networks. Microsoft created Azure AD to help clients move their directories from an on-premise Active Directory (AD) server to the cloud.
Some have adapted by syncing their Azure AD with an LDAP server, but this solution still uses PEAP-MSCHAPv2 for authentication.
EAP-TLS (certificate-based authentication) requires a Public Key Infrastructure to enroll and manage certificates to be used for Wi-FI. That’s why Cloud RADIUS was designed to easily integrate with Azure AD, so organizations can easily use their Azure AD for WPA2-Enterprise. Below we break down the solution into three steps:

- Tie your PKI Infrastructure to Azure AD.
- Tie your RADIUS Infrastructure to Azure AD.
- Tie your Device Management platform to the SecureW2 (Parent of Cloud RADIUS) cloud PKI.
Configuring a SAML Azure Application for WPA2-Enterprise
End-users can enter their credentials into the SAML app, which are then sent to and verified by Azure AD. Once Azure AD sends back attributes, the SAML app will share them with SecureW2 PKI to issue certificates.
Create a SAML Application in Azure
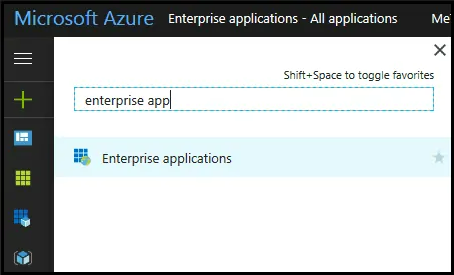
To create a SAML application in Microsoft Azure:
- From your Microsoft Azure Portal, use the search feature to go to Enterprise
applications.
- In the main pane, click New application.
- In the Add an application pane, under Add from the gallery, enter
‘SecureW2‘ in the search field.
- If the SecureW2 JoinNow Connector application appears:
- Select it.
- In the Add your own application pane, click Add.
- If the SecureW2 JoinNow Connector application does not appear:
- Click Non-gallery application.
- In the Add your own application pane, for Name, enter a name.
- Click Add.
- If the SecureW2 JoinNow Connector application appears:
Create an Identity Provider in SecureW2
An identity provider (IDP) is the system that proves the identity of a user/device.
Creating an IDP in SecureW2 tells the Cloud Connector system how to connect to your Azure user database, verify user credentials, and issue certificates.
To create an IDP in SecureW2:
- From your SecureW2 Management Portal, go to Identity Management > Identity Providers.
- Click Add Identity Provider.
- For Name, enter a name.
- For Description, enter a description.
- Click the Type dropdown and select SAML.
- Click the Saml Vendor dropdown and select Azure.
- Click Save.
Now, SecureW2 Cloud Connector knows how to exchange information with your Azure user database.
Configure Single-Sign-On in Azure
To configure single sign on in Microsoft Azure:
- From your Microsoft Azure Portal, click Configure single sign-on
(required).
- Click the Single Sign-on Mode dropdown and select SAML-based Sign-on.
- In a new browser tab/window, log into your SecureW2 Management Portal and go to Identity Management > Identity Providers.
- Click Edit for the IDP you created in the previous section.
- Select the Configuration tab.
- Copy and paste as follows:
- From SecureW2, copy the information for EntityId and ACS URL, and
- Paste respectively into Azure for Identifier and Reply URL.

- In the SAML Signing Certificate section, in the DOWNLOAD column, click Metadata XML. Save the metadata file (.xml) to your computer.
- Click Save.
Configure the IDP with Azure Metadata
To upload the Azure metadata to SecureW2:
- From your SecureW2 Management Portal, go to Identity Management > Identity Providers.
- Click Edit for the IDP you created in the section “Create an Identity Provider in SecureW2”.
- Select the Configuration tab.
- Under Identity Provider (IDP) Info, for Metadata, click Choose File.
- In the window that appears, select the metadata file (.xml) you saved to your computer in the previous section.
- Click Upload.
- Click Update.
Integrating Active Directory with the Azure SAML Application
After you’ve configured your SAML Application in Azure and SecureW2, it’s time to assign users to it. You can do this by directly assigning users, if you have them stored in Azure, or you can integrate it with your Active Directory. Below we will show you how to do both.
Add Users to the SAML Application
- From your Microsoft Azure Portal, go to the JoinNow Connector Application, or the SAML application you created in the section “Create a SAML Application in Azure”.
- Go to Manage > Users and groups.
- Click Add User.
- In the Users and groups pane, use the Select field to search for the
user by name or email.

- Select the user, and then click Select.
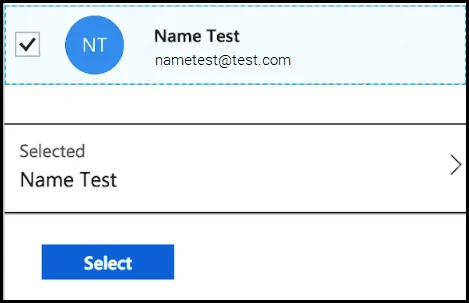
- In the Add Assignment pane, click Assign.
Grant SAML Application Access to Active Directory
To allow your SAML application to access Active Directory:
- From your Microsoft Azure Portal, use the search feature to go to App registrations.
- Next to the search field, click the dropdown and select All apps. This displays a
list
of all available applications.

- Click your application.
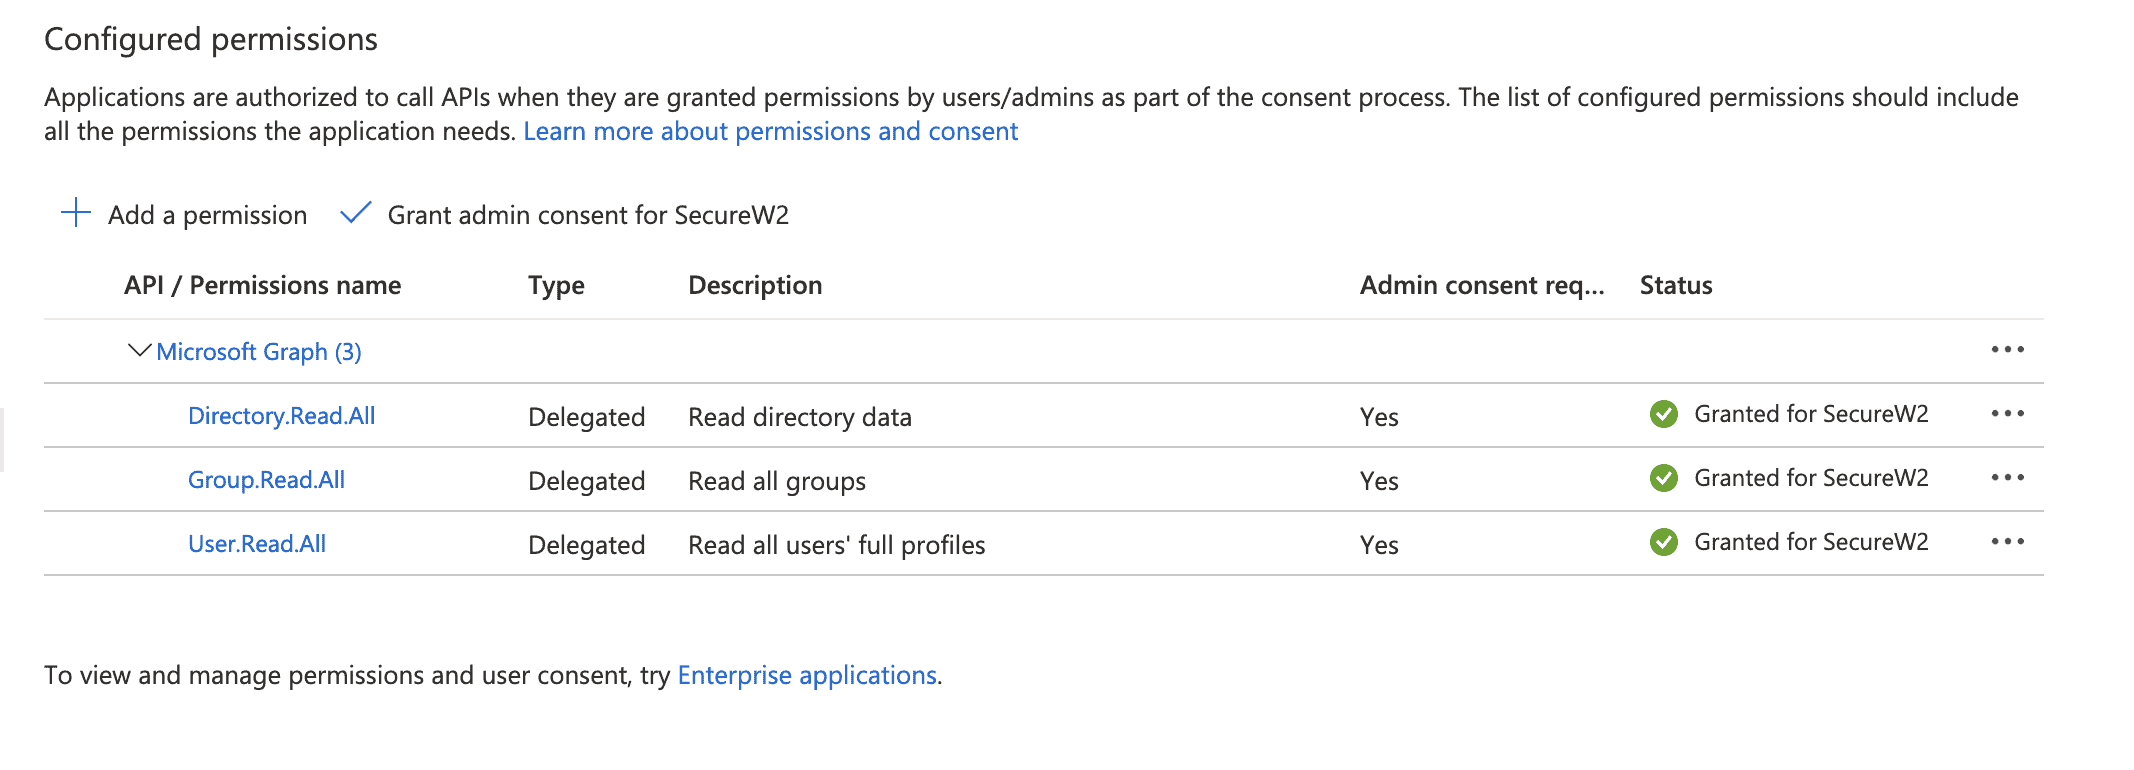
- In the pane that appears for your application, scroll under Manage and click API Permissions.
- Under Configured Permission, click Add A Permission.
- In the Request API permissions pane, select Microsoft Graph and Delegated Permission.
- Select the following permissions:
-
Directory.Read.All
- Group.Read.All
- User.Read.All
-
- Click Add Permissions. You should see the following image.
- In the pane for your application, click Settings.
- Click Manifest > Edit.
- In the Edit manifest pane, in the source code:
- For the ‘groupMembershipClaims‘ variable, change the value to ‘All‘.
- Click Save.
Configure Attribute Mapping and Policies for 802.1x Certificates
Certificates attach a name or device ID to every network connection, establishing device and user trust with a high degree of assurance. They can also be encoded with Azure AD attributes, making it easy to implement group policies and establish strong role-based access control.
Configure Attribute Mapping in SecureW2
To configure attribute mapping in SecureW2:
- From your SecureW2 Management Portal, go to Identity Management > Identity Providers.
- Click Edit for the IDP you created in the section “Create an Identity Provider in SecureW2”.
- Select the Attribute Mapping tab.
- Click Add.
- For Local Attribute, enter ‘upn‘.
- Click the Remote Attribute dropdown and select USER_DEFINED.
- In the field that appears, enter
‘http://schemas.xmlsoap.org/ws/2005/05/identity/claims/name‘.

- Click Next.
- Click Add.
- For Local Attribute, enter ‘email‘.
- Click the Remote Attribute dropdown and select USER_DEFINED.
- In the field that appears, enter
‘http://schemas.xmlsoap.org/ws/2005/05/identity/claims/emailaddress‘.

- Click Next.
- Click Add.
- For Local Attribute, enter ‘displayName‘.
- Click the Remote Attribute dropdown and select USER_DEFINED.
- In the field that appears, enter
‘http://schemas.microsoft.com/identity/claims/displayname‘.

- Click Next.
- Select the Basic tab.
- For Group Map Attribute, enter ‘http://schemas.microsoft.com/ws/2008/06/identity/claims/groups‘.
- Select the Groups tab.
- Click Add.
- For Local Group, enter a name.
- In a new browser tab/window, log into your Microsoft Azure Portal and go to Azure Active Directory > Groups > All groups.
- Use the Name field to search for the group.
- Click the group, and then go to Properties.
- For Object ID, copy the value.
- Return to your SecureW2 Management Portal.
- For Remote Group, paste the Object ID value.
- Click Create.
- Click Update.
Update the Profile Policy in SecureW2
To update the profile policy in SecureW2:
- From your SecureW2 Management Portal, go to Policy Management > Profile.
- Click Edit for the profile policy.
- Select the Settings tab.
- Click the Identity Provider dropdown and select the IDP you created in the section “Create an Identity Provider in SecureW2”.
- Click Update.
Update the User Role Policy in SecureW2
To update the user role policy in SecureW2:
- From your SecureW2 Management Portal, go to Policy Management > User Roles.
- For DEFAULT ROLE POLICY 1, click Edit.
- Select the Conditions tab.
- Click the Identity Provider dropdown and select the IDP you created in the section “Create an Identity Provider in SecureW2”.
- Click Update.
Add a User Role Policy in SecureW2
To add a user role policy in SecureW2:
- From your SecureW2 Management Portal, go to Policy Management > User Roles.
- Click Add Role.
- For Name, enter a name.
- Click Save.
- Select the Conditions tab.
- Click the Identity Provider dropdown and select the IDP you created in the section “Create an Identity Provider in SecureW2”.
- In the Attribute/Groups section, confirm that the Groups list shows the group you created in the previous section.
- Click Update.
Add an Enrollment Policy in SecureW2
To add an enrollment policy in SecureW2:
- From your SecureW2 Management Portal, go to Policy Management > Enrollment.
- Click Add Enrollment Policy.
- For Name, enter a name.
- Click Save.
- Select the Conditions tab.
- In the User Role list, select the user role policy you created in the previous section.
- Click Update.
Republish Your Network Profile
To republish your network profile:
- From your SecureW2 Management Portal, go to Device Onboarding > Network Profiles.
- For your network profile, click Re-publish.
- In the Republish Network Profile window, click OK.
- NOTE: You should republish your network profile every time you make a significant change. The process takes 60-90 seconds.
Creating an App in Azure for RADIUS Lookup
SecureW2’s Cloud RADIUS has the industry-unique ability to perform directory lookups at the moment of authentication. This enables more policy enforcement options and a more robust authentication security.
New App Registration
- Login to Azure.
- Navigate to App Registrations.
- Click New Registration.
- Configure the following settings:
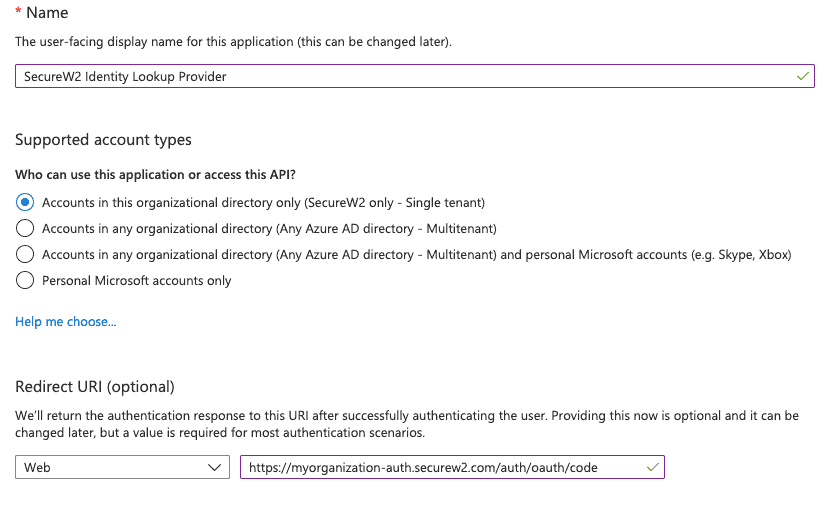
Note: Use your unique SecureW2 Organization URL as the Redirect URL like so; https://myorganization-auth.securew2.com/auth/oauth/code
Create a Client Secret
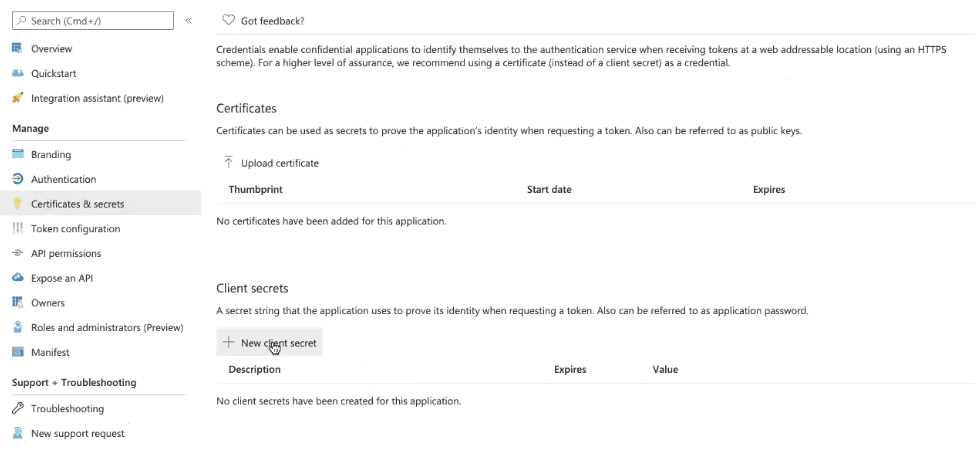
- Navigate to Manage.
- Then click Certificates & secrets.
- Click New client secret.
- Enter in a name under Description.
- Select an expiration date under Expires.
- Click Add.
- Now you should see your Client Secret under the Value column.
- Make sure to save this somewhere safe, as this secret is non-recoverable!
Create a Provider URL and Client ID
- Navigate to the Overview section and you will see a screen like below:
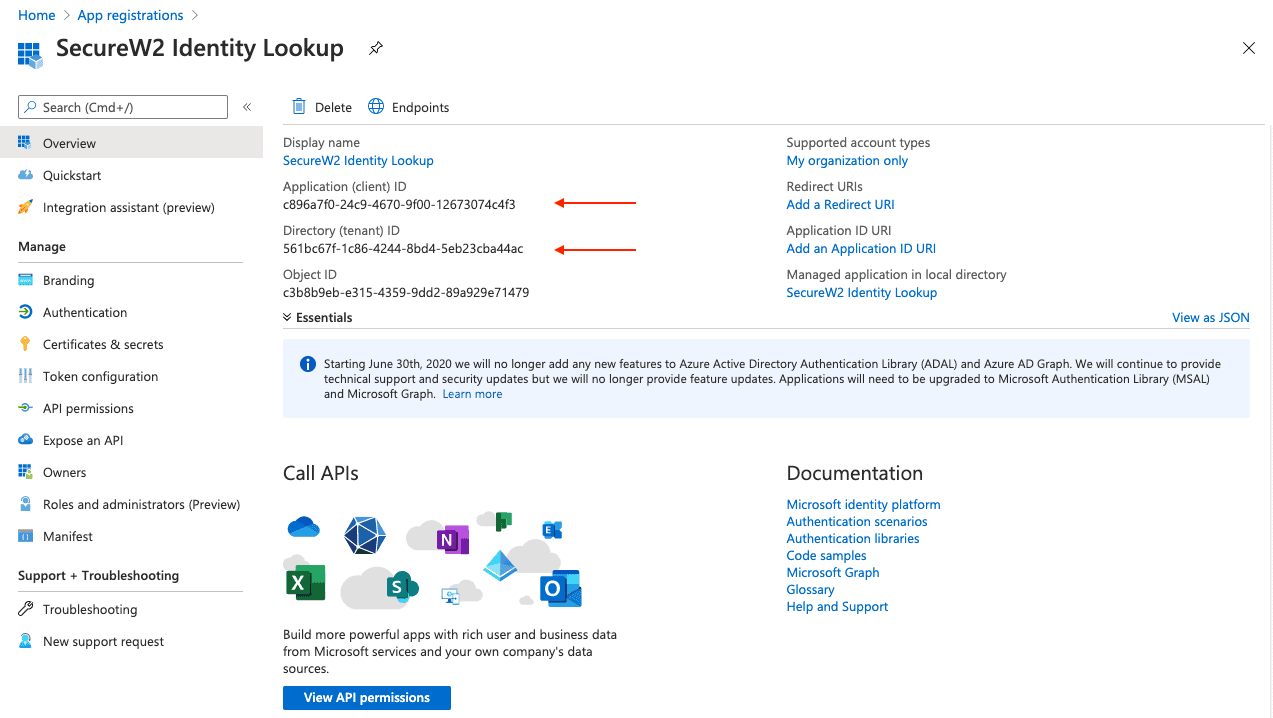
- Copy your Application (client) ID and save this for later.
- Copy your Directory (tenant) ID.
- Insert it into the following URL:
- https://login.microsoftonline.com/{Directory (tenant) ID}
- Should look like this:
- https://login.microsoftonline.com/561bc67f-1c86-4244-8bd4-5eb23cba44ac
- Save this for later.
- Insert it into the following URL:
API Permissions
Lastly, we need to give this application permission to access the data in our Azure directory.
- Navigate to API Permissions under the Manage section.
- Click Add a permission and add the following permissions:
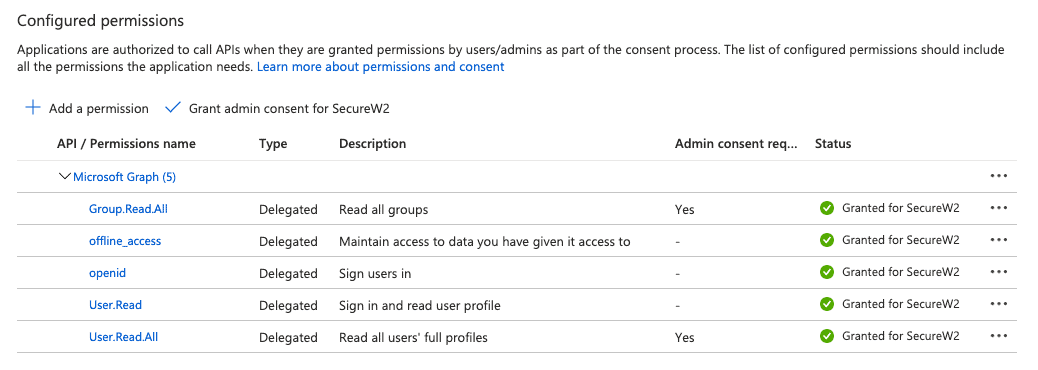
- After adding the permissions, click Grant admin consent for {your organization}.
Configuring RADIUS Lookup in Cloud RADIUS
An identity provider (IDP) is the system that proves the identity of a user/device. Creating an IDP in SecureW2 tells the Cloud Connector system how to connect to your Azure user database, verify user credentials, and issue certificates.
During the authentication process, identity lookup validates that a user is active within the organization by checking the identifying information against the existing users in the Identity Provider.
- Navigate to Identity Providers in the Identity Management section.
- Click Add Identity Provider.
- Enter a Name.
- Description is optional.
- Select Type as:
- Identity Lookup Provider
- AZURE
- Identity Lookup Provider
- Click Configuration while still in the Identity Provider edit menu.
- For Provider URL enter the URL we created before using the Directory (tenant) ID.
- https://login.microsoftonline.com/{Directory (tenant) ID}
- Which should look something like this: https://login.microsoftonline.com/561bc67f-1c86-4244-8bd4-5eb23cba44ac.
- For Client ID enter in the Client ID that you retrieved from Azure previously.
- For Client Secret enter in the Client secret you generated in Azure previously
and
saved in a secure place.
- After updating the Identity Provider, this secret will not be retrievable, so make sure this is saved in a secure place.
- Click Update.
- For Provider URL enter the URL we created before using the Directory (tenant) ID.
- Lastly, click Authorize on your new Identity Lookup Provider.
- This will test the connection between SecureW2 and your Azure App.
- This is a mandatory step, as it grants our application the final authorization to call our Azure API to grant User Info.
Configuring Groups
Lastly, Cloud RADIUS can perform a User Group Lookup so we can create network access policies based off of the Groups a user is in.
- Navigate to the Groups tab.
- Click Add.
- Create any name for Local Group.
- This name will be what shows up later as our ‘Group’ in the SecureW2 Management Portal when we configure policies.
- In Remote Group enter in the name of your Group as it is configured in Azure.
- Create any name for Local Group.
- Click Update.
- Repeat as necessary for any Group you wish to create Network Policies around.

Configuring Policies
Dynamic RADIUS allows the RADIUS to segment users and restrict/allow resources based on information stored in their directory entry. Since enforcement occurs at runtime, changes made to a user’s permissions are propagated throughout the system immediately rather than a day or two later, as is typical with most RADIUS servers.
Account Lookup Policy
Lookup Policies are how we tie our new Identity Lookup Provider to domains. Here we will create a condition that ties our domain to the new Identity Lookup Provider we just created in the previous section.
- Select Lookup under Policy Management.
- Click Add Identity Lookup Policy.
- Create a Name and click Save.
- Navigate to the Conditions tab.
- Configure the following settings:
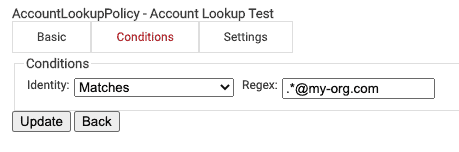
- Configure the following settings:
- Navigate to the Settings tab
- Select the Identity Lookup Provider we just created in the previous section.
User Role Policy
Next, we need to create a User Role Policy for Network Authentication. This policy will be used by Cloud RADIUS’ Dynamic Policy Engine to lookup user status at the moment of authentication. Then Cloud RADIUS can dynamically apply Network policies, which we will configure next.
- Add a Role.
- Create a Name.
- Because we need multiple User Roles, specifying this is for User Network Authentication is recommended.
- Click Save.
- Navigate to Conditions.
- Under Identity Provider: select the Azure Identity Lookup Provider that we just created in the previous section.
- Click Update.
Group Role Policy
Lastly, we need to create Role Policies for any Groups that we want to give differentiated network access. We can then leverage Cloud RADIUS’ Dynamic Policy Engine to send unique RADIUS attributes based on the Group users belong to with our Network policies.
- Add a Role.
- Create a Name.
- Because we need two User Roles, specifying this is for Group Network Authentication is recommended.
- Click Save.
- Navigate to Conditions.
- Under Identity Provider: select the Azure Identity Lookup Provider that we just created in the previous section.
- Under Groups select the group that we want to apply this Role to.
- The group names that show up here, are the Local Groups that we configured
previously in our Identity Lookup Provider.
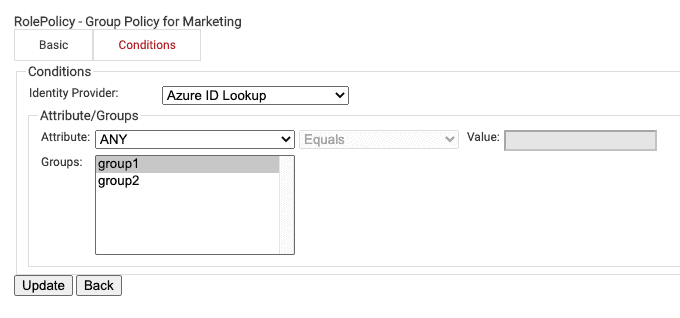
- The group names that show up here, are the Local Groups that we configured
previously in our Identity Lookup Provider.
- Click Update.
DEFAULT FALLBACK ROLE POLICY
You may notice that there is a “DEFAULT FALLBACK ROLE POLICY” in your User Role policies after you create a Identity Lookup Provider.
The purpose of this policy is: If the Identity Lookup fails, allow the user to still authenticate to the network but assign them a unique role.
This ensures that both users don’t experience disconnects if there’s a small hiccup in the connection between Azure and Cloud RADIUS, but your network can remain secure and you can have those users auto-assigned into a Guest VLAN.
Note: DEFAULT FALLBACK ROLE POLICY is by default assigned the DEFAULT NETWORK POLICY
Network Policy
The purpose of a Network Policy is to specify how Cloud RADIUS will authorize access to a particular User Role.
A typical Network Policy would say something like: “If User Role = Staff, authorize access and assign them to VLAN 2”.
You can configure any RADIUS Attribute to be sent to the wireless controller. If you leave the attribute section blank, it will just send Access Accept. To create and configure the Network Policy, follow the steps below:
- Click Network in the Policy Management section.
- Click Add Network Policy.
- Enter a Name.
- Click Save.
- Navigate to Conditions.
- Select the User Role you want assigned this Network Policy.
- For this guide, it would be the policy you created in the User Role Policy for Network Authentication section.
- You can select multiple User Roles to assign a Network Policy to.
- Select the User Role you want assigned this Network Policy.
- Navigate to Settings.
- Click Add Attribute.
- Select the Attribute you wish to send to the wireless controller.
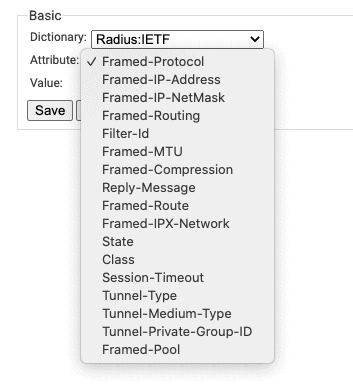
- Enter in the Value appropriate for your attribute.
- Click Update.
- Select the Attribute you wish to send to the wireless controller.
- Repeat as necessary for all the attributes you want to send for your User Role.
- Click Add Attribute.
Setting up 802.1X authentication for WPA2-Enterprise with Azure is easy when you use SecureW2. Most importantly, it keeps your network and its users secure. SecureW2 is also regarded as one of the most cost-effective solutions in its class. Click here to learn about our pricing.
Microsoft Azure is a registered trademark of Microsoft Corporation in the United States and/or other countries. Other trademarks, logos and service marks used in this site are the property of SecureW2 or other third parties.